1.15.2019

Tournament in Passau - final Table!

The final round is Butchers... not a great matchup for the smiths, but we might manage?

Furnace
Anvil
Farris
Sledge
vCinder
Cast

vs

Ox
Princess
Boiler
Boar
Tenderizer 
Roast 

Turn 1 and 2 

 vCinder kicks and can get some damage in after getting buffed with One at a Time, Lads, Tooled up and Quick Foot. Then, I make a mistake when my opponent plays Seize the Initiative, despite going second. Instead of dodging up Furnace on one flank, I dodge up Cast on the other, putting a second apprentice into danger and allowing Ox to retreat to relative safety. This means he can now pop Legendary and 5 Smithies get Butchered.

It's a very empty field out there. 


Turn 3

 Yeah, I can kill Boar and Ox for some honorary points, but the butchers just need one Take out to wrap up, which they easily manage.
The Gang came back, but there is no hope for a win here.

1.14.2019

Tournament in Passau - Round 2

It's Round 2 and I am paired against Farmers

Farris
Hearth
Anvil
 Bolt
Sledge
Cinder

vs

Thresher
Peck
Windle
Tater 
Ploughman
Jackstraw 

 Turn 1

Thresher charges into Cinder and does some good damage. Due to a lot of melee zones around and the Counter Charge, I can't score a goal, but Sledge does a lot of damage into Thresher.

Turn 2

Thresher gets killed. Cinder gets the Ball and with some Teamwork dodges and some Playbook dodges is able to score the Goal. Ploughman is prepared for the Takeout in the next round.

Turn 3 and 4

Ploughman, Sledge and Bolt all get taken out. With her Legendary, Farris is able toget the Ball free in Turn 4 and pass to Anvil. Due to Match Experience, both dodge and therefore the is able to put Quickfoot on Bolt. After Windle comes in to make the pass from Anvil harder, Bolt uses Stamina, his Free I'm Open and a Sprint to get within 6" of the Goal and scores for the win!


1.08.2019

Tournament in Passau - Round 1


New year, old guild. I took my Blacksmiths to a small 8 Man Tournament in Passau.
Ferrite stays home, and my first opponent are the Fish.

Furnace
Anvil
Burnish
Iron
Sledge
vCinder

vs

Shark
Salt
Angel
vSakana
vSiren
Fathom

 
 Shark kicks off and the game is on!

 Turn 1

Anvil collects the Ball and kicks it to Iron, who dodges into the cover of the goal post and into Sentinel and Reinforced Plating. Shark charges Iron, gets a Momentous Dodge and throws his net. After that he does pretty much nothing. I engage Shark with as many people as possible.
Shark is facing down a lot of hurt


Turn 2 and 3

Shark gets Sledged, Angel dies to vCinder. More Fish come towards the Blacksmith goal and in Turn 3, Fathom finally gets a hold of the Ball

It's ok Iron, you did your job well

Turn 4

Sledge kills Siren, Fathom scores. The Ball lands on Furnace. He drops the Ball on Cinder, who finishes Sakana and runs Forward to score for the win, despite Salt coming in to engage. Grim Vengeance for the dodge is still pretty good.

12 - 4 for the Blacksmiths!


12.12.2018

The Season 4 Bootcamp - Last Words


Welcome to the last part of the Season 4 Bootcamp, where we talk about some small topics that are left over.

Your first tournament

If you want to get good at the game, going to tournaments is mandatory. In tournaments, you can play several games a day and you will often play new opponents(more new opponents the further you travel). It doesn't matter if you choose a 16-man local tournament as your first one or if you debut your career at vengeance. Just don't expect to do too well at your first time and have fun.
The purpose of your first events is to get comfortable in the tournament environment. It can be exhausting and the stricter time schedule might be unusual for you. Still, I can tell you that tournaments can be a ton of fun and my opponents have always been relaxed and fun to play.
Some tips for tournaments: Bring a tray, even a kitchen tray will do, it is way better than always packing up your stuff. Stay hydrated since dehydration will deter your concentration.

Studying the game

You don't always have to be on the pitch to up your game. There are several options to study the game outside of playing. Learn cards, listen to podcasts and watch match reports. Also, discussing the game with other people might give you some insights. It's important to not eat up all the opinions of podcasters and other people, but they might give you some new ideas on tactics or synergies.
Practicing remains the most important part, but you don't always have the time and the opponents, so starting to study the game can accelerate your progress.

Reading your opponent

This is something mostly related to choosing the gameplan cards. If you know how the opponent plays, you can sometimes choose a better card for you than the one you are “supposed” to play. Let's say you know that your opponent will play in a way that he plays his low cards when you are up on momentum, and always guarantees himself the initiative when he is up. This means you can get away with playing lower initiative cards when you are up, keeping the high cards for situation where you really need them. It also means there is no point in playing a high card when down on momentum, since your opponent will play his high ones too.
Having a read on what your opponent's plan is when you look at his influence might help you counteract that, but it should not derail you too much from your own plan. You need to score those VP, too!

That is it. I hope you got something out of the Season 4 Bootcamp. See you around next time!


11.26.2018

The Season 4 Bootcamp - Starting you game off right

Well, here we are, the first turn of the game. It is a very important turn, even more so in Season 4. Since a game of Guild Ball usually lasts only 2-4 turns, it is a big part of the game that you can't neglect when trying to play well.

The specialties of turn 1

Why talk turn 1 specifically then? It is the most practicable turn of all and there is a plethora of ways you can pretty much lose the game there. The starting point of turn 1 is always similar: Both teams are 16” apart, except for the kicking model. This makes developing a strategy easier, since you know the general implications of the situation.

Kicking or receiving? 

You can make a case for both. For me, I am a fan of kicking, especially in Season 4.

Kicking

If you kick, you start with a momentum, 1 model is farther up the field and you have the last activation. The kicking model can often threaten a turn 1 goal. Additionally, the last activation might give you enough momentum to get the initiative for turn 2.

Receiving

Receiving gives you control of the ball, which means you can extend your ranges with dodging and you can generate momentum by passing it around.  If you can control the kicking model, you can usually convert the ball into a turn 1 goal, giving you 4 points and the additional influence.

How does turn 1 usually work?

The kicking model usually is a strong beater or a strong football player, and very often, you want to kick off with your captain and give him or her a full stack of influence. Since the lines are still pretty far apart, turn 1 usually consists of setting up 1 model and then have a big activation with it.

Here is where you can have some plans preset. How are you going to throw a wrench into their plan? For example, a Mortician player receiving can use Silence's Tucked to let the kicker go first and giving the kicking player not much of an activation. If you have additional movement, like Midnight Offering from Zarola, you can put another model forward as the kicking player. Additionally, this is the turn where you will use character plays the most. Most of your players won't reach opposing models, so buffing your models with them is a good idea and usually, you have the time to do so.

 The goals of turn 1

What I am looking to do in turn 1 is a collection of things. First, if i can score a goal, I will most of the time do so. The additional goal influence is very valuable for the rest of the game and 4 points are 4 points. If I can't score a goal, it's important to try the best to deny the goal to the opponent and set up for turn 2. Ideally, this means winning initiative and setting up for a takeout or goal run at the top of turn 2. If I can't win the initative, it is important to make the impact of the opponent as little as possible. You might need to give up a takeout or a goal, but the counter-punch has to be well set and you are still in the game.


Next time, we will wrap up the bootcamp with some small topics that don't fit anywhere else.
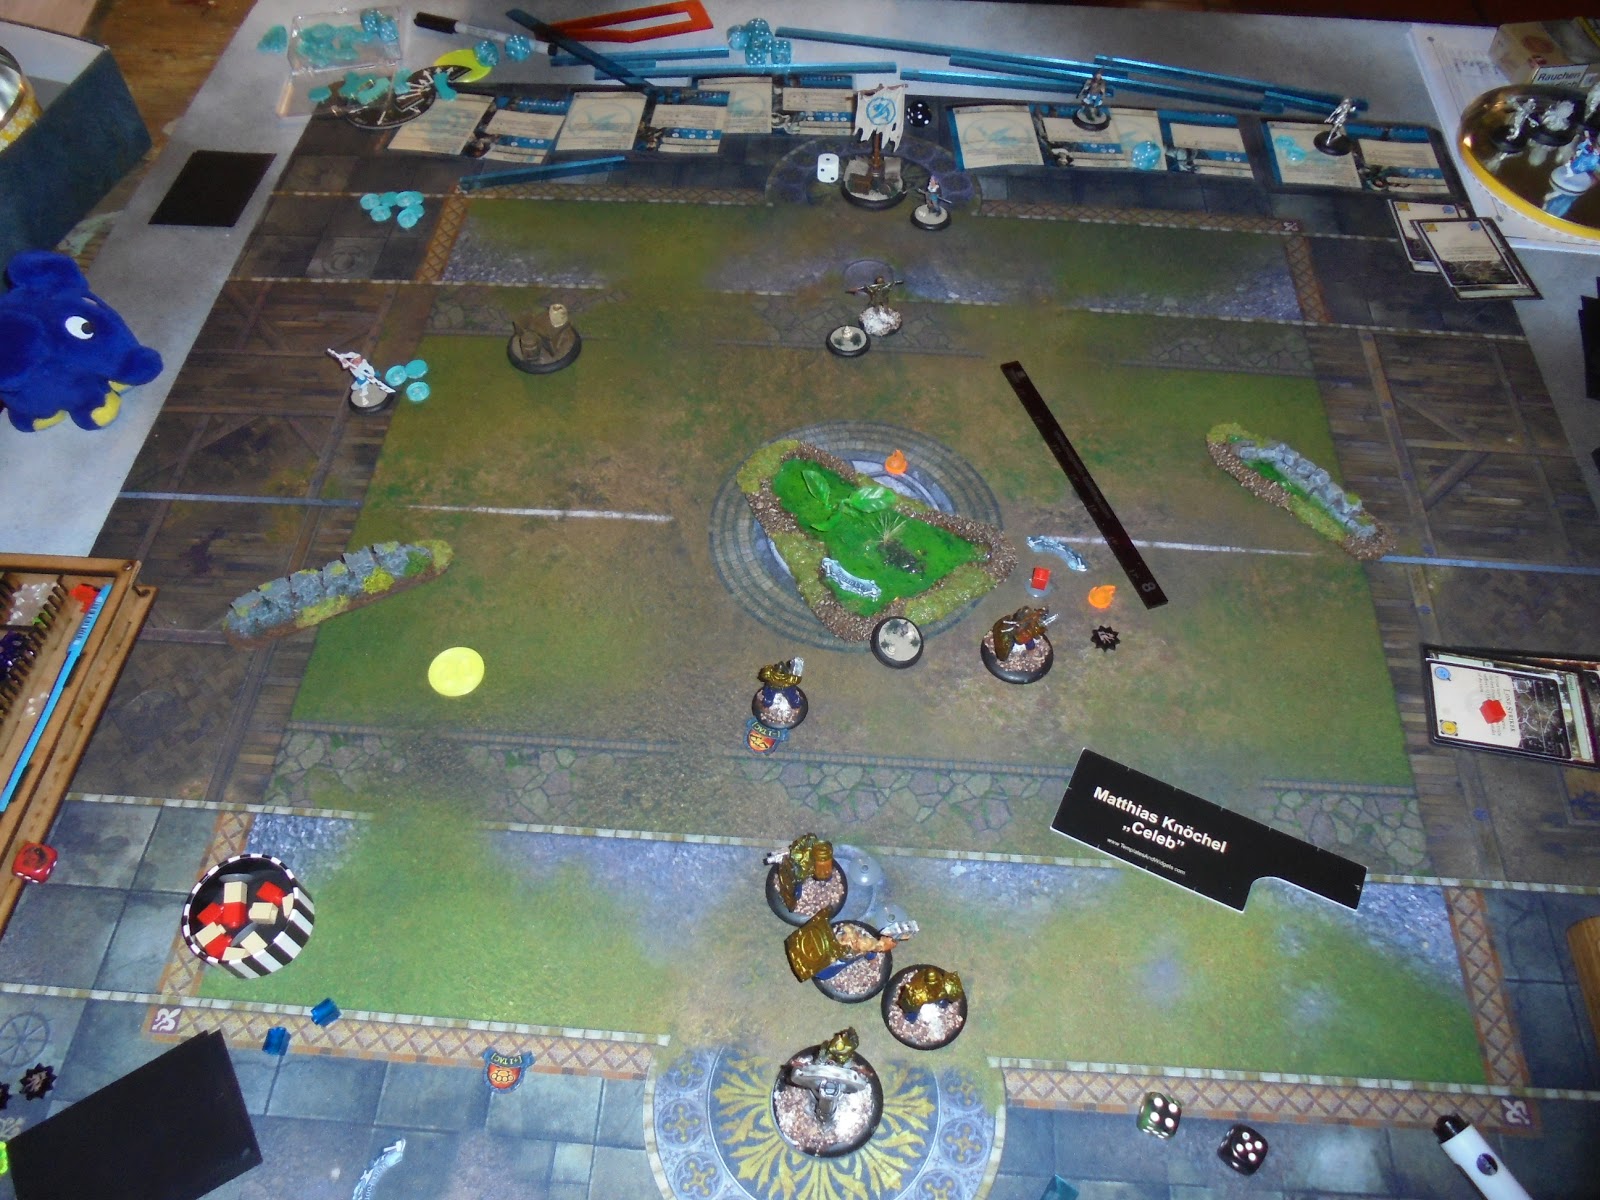
11.20.2018

The Season 4 Bootcamp - Fighting Games

Welcome back to the camp! Today, we will talk about the takeout-game.

Target Selection

You won't always have the luxury to choose your targets, but if you do, it is very important to choose the right ones. The basic rules of getting yourself an activation advantage apply. Killing  a model that hasn't activated and has influence is best, a model that has already activated is worst.
Newer players tend to go for the models that are easiest to take out, but this is not always the best option. In a fighting matchup, taking the easy route might net you 2 VP, but taking out a more valuable model will give you more advantages. It might be harder to take out Hooper than it is Friday, but Hooper is a quite slow beater model and having him out means you win the fight more easily.

Where to fight

If you can decide where to draw the line of engagement, you should take into consideration where on the pitch you want to fight. Fighting close to the edge means you want good pushing models for pushing models off.
The more important consideration is the half you want to fight in. If you fight in your half, taken out models will get faster to the fight again, but are also more reachable for the opponent. Also, the threat to get tackled and scored on is higher the closer you are to the goal. The opposite is true if you fight in the opposing half.

Taking models “hostage” 

This is a very powerful weapon in your arsenal. If you have last activation and you are confident you can win the initiative, keep the model you want to take out at low HP. Win the initiative and kill the model at the top of your next turn. This costs a bit more influence, but you get the activation advantage and delay the model coming back for another turn. If you do this and your opponent doesn't, this alone can win you the fight.


This is as always just a general overview, but I hope I was able to provide some ideas on the take out game. Have fun killing your opponent's models!

Next time, we will talk about the first turn. 

11.06.2018

The Season 4 Bootcamp - Play Ball!


The Ball is a central part of Guild Ball. I mean, it's even in the name of the game, right? So, how does ball play work in Guild Ball? 

Killing the Ball


I am not talking about the Character Play Cinder and Burnish have. Killing the ball means putting the ball marker out-of-play for as long as possible. 

Sometimes you hear new players say “I want to play a take-out focused team. Just ignore the ball and kill their players”. Well, against any semi-competent football team, you just lost the game. The game is called Guild Ball, not Guild Brawl for a reason. If you ignore the ball, the football team can score their goals faster than you take out their players, and they get double the VP for that, too!

This means you have to take actions to prevent your opponent from getting the ball. Let's talk about what you can do. 

Putting the ball on ball-holders


Models with Close Control, means against Character plays and high defense are great to keep the ball away from opponents. Unpredictable Movement, like on Greyscales, also helps. Iron is one of the hardest models to get the ball away from, especially if you factor in Sentinel from Anvil and Reinforced Plating from Burnish. Mascots that don't contribute to the fight like Peck are also good for this because they can add another factor to the equation...

Distance


... which is staying far away from the opposing ball players. If you can make sure that the ball can not be reached by the opponent, it is dead for the round.  Additionally, you can put the ball on the ground then to not be affected by Seduced from Siren or Puppet Master from Obulus. But beware, if Siren uses Lure or Obulus makes you Jog, they can choose to snap the ball you dropped and then the ball is suddenly a lot closer to them

Kicking the ball back to them

It is not a common move, but it can buy you the time you need. Kick the ball o space, into their half, and as far away from any player as possible. Your opponent will need some time to get the ball back and as soon as he has it under control, you try to get it back under control. It's a high risk move, so be considerate when you pull this maneuver. 

Trap: The Self-kill

If you really want to help out your opponent when you are playing a football team, and he is playing a killing team, use the self-kill. This means having the ball on a model that has already activated. Unless you have abilities like I'm Open (ex. Bolt) you won't get the ball off that player in the current round.


 Reviving the Ball

Yeah, so now we change sides. When trying to play football, your opponent has killed the ball, what do you do now? How to get the ball back? 

The ball is on a ball holder

This is a common situation. The Ball is on Someone like Iron and you have a hard time getting it off. This is where you have to use your “secondary” measures more often. Don't rely on Shark tackling the ball, use veteran Sakana's Fancy footwork triggered off hitting the nearby master. A common secondary option is knocking down the ball-holder. It's more risky than tackling and doesn't guarantee you control of the ball, but it means your opponent has to deal with the scattered ball. This gives you the option for an easier pick-up in the next activation. 

The Ball is far away

In this situation, closing the distance while exposing your models to the least threats possible is key. Also cut off any escape routes for the ball. Let's have an example what I mean by that.

 
Other models omitted for simplicity

 Brisket has the Ball, the Butchers have the initiative and Crucible is due to come back. 

 Now, if you bring Crucible on from the left side, you cut off the obvious escape route of Brisket. She can just run to the left to avoid Vitriol, but if she goes there and Crucible waits, she can threaten the ball. 

The Ball got kicked into your half

In this Situation, it's important to first not lose the ball until you score again. Get it under control, stay as safe as possible and score when ready. 

This concludes today's topic. Next time, we will talk about fighting!