I’m back with the blog for Season 4!
In this little series, I want to provide a primer for people looking to get into the game (and maybe an intermediate player can get some mileage out of it, too).
The Season 4 Bootcamp will try to give you a basic understanding of the tactics and strategy of Guild Ball. When you start to read on these articles, you should have a firm grasp of the rules. I will also not provide full rules text on the abilities of Models, but I will provide example models who posess these rules so you can look up the exact text in the app or on the card.
So, let’s dive into the first topic, the five resources of Guild Ball, that being Influence, Momentum, the Ball, Clock and conceded VP.
Managing your influence is something that needs a lot of practice and experience. It’s a obviously a vital part to the game since it dictates what you can do during a given turn, but there is not a clear cut answer to how to distribute it. Often times, you will fully load models that are attacking the opponent and give enough influence to your buffing models to get the buffs going.
Then we have the concept of invalidating influence. Since influence is a limited resource each turn, if you can manage to get influence off the table somehow, you just reduced the amount of actions your opponent can do. Invalidating influence can be done by taking out a model with influence on, Disengaging through a counter-attack, or controlling a model in a way that it can’t reach you (through distance, conditions or plays like Goad from Marbles)
Healing your players is very important and sometimes you just need to get those conditions off. Dodging after passing can open up vectors and Defensive Stance/Counter Attacks can throw a wrench into your opponent’s plans.
Sometimes, Momentum can grant you “free” actions that you don’t have to pay influence for. Let’s look at the example of Counter-Attacks. Many people use counter-attacks just to disengage or threaten a disengage through dodges and pushes. While this certainly is a use, sometimes character plays triggered through the playbook have value, too. Mallet, for example, can trigger Singled out on the counter attack and then suddenly all the models have +2 TAC on your attacker, without mallet using any influence or needing to activate! I’m sure you’ll find other examples of counter-attacks that might not be good at disengaging, but certainly have other value.
To see how massive of a difference the ball can make, I constructed a little example:
The Score is 8 – 6 in favour of the Fishermen. It’s the Order player’s turn
Both you and your opponent get the same time (45 minutes + the 1 minute activations) to play your game. There is a simple goal here: Don’t clock yourself (first). If you clock yourself you get two disadvantages: You activations only last one minute (even bis ones) and every activation grants a VP to your opponent (even small ones). You can maybe get through 5 activations in 2 minutes, but your captain takes 1 minute and 15 seconds, that is fine as long as you are not clocked, but after clocking, this is bad.
If you have a clock advantage, it’s good to press it with fast activations. Take your time for the important ones, but if you have an empty mascot, don’t try to put it at the perfect spot. An activation that is “good enough” but doesn’t give your opponent time to think is better here.
Also, think while your opponent is doing things. It’s “free” thinking time for you.
Don’t be shy to take a longer activation if it’s important. Confirm everything with your opponent and do that activation as perfectly as possible.
And the last thing, even when you are down on clock, as long as you get your 12 points before (or as) the clock hits 0, it’s still good time management.
Now, let’s flip our viewpoint of VP around. Let’s say you start with 12 Health, a Goal deals 4 Damage to you and a Takout 2. Sounds similar? Because it is.
The goal of Guild Ball is not to prevent your opponent from making VP, but to get to 12 VP faster than him. Trying to deny every single VP will result in you losing slower, but still losing. Of course, you don’t want to give out easy VP, but sometimes it’s better to let something happen.
Let’s have some examples:It’s 0 – 0, you have initiative and are facing a goalrun from Vitriol, but you could just let the goal happen and take out Smoke with 6 influence on her. Taking out Smoke let’s you invalidate influence, get activation advantage and 2 VP, for giving up 4 VP (if the Alchemist cashes in and also gives you control of the Ball). a pretty obvious example.
On the other hand, let’s say it’s 4 – 4 and you are now in the shoes of the Alchemist player and have initiative. Now you cunningly let Smoke have no Influence and take the goal, putting the score at 8 – 4. After Smoke gets taken out, it’s 8 – 6 and you just need one more goal to win. A worthwile trade in my opinion.
This is why being at 8 points is such a strong position in the game, because your opponent can’t afford to trade VP for board position anymore. Recognizing spots where you can give up some VP for a better position later will surely let you win more games.
In this little series, I want to provide a primer for people looking to get into the game (and maybe an intermediate player can get some mileage out of it, too).
The Season 4 Bootcamp will try to give you a basic understanding of the tactics and strategy of Guild Ball. When you start to read on these articles, you should have a firm grasp of the rules. I will also not provide full rules text on the abilities of Models, but I will provide example models who posess these rules so you can look up the exact text in the app or on the card.
So, let’s dive into the first topic, the five resources of Guild Ball, that being Influence, Momentum, the Ball, Clock and conceded VP.
Influence
The most obivious of the resources, Influence, is what makes your Players do actions on the Pitch. Each model’s actions are limited by the Influence cap and they provide a certain amount of Influence to the Pool. Goals give you another influence and Game Plan Cards can give you a temporary boost to your influence.Managing your influence is something that needs a lot of practice and experience. It’s a obviously a vital part to the game since it dictates what you can do during a given turn, but there is not a clear cut answer to how to distribute it. Often times, you will fully load models that are attacking the opponent and give enough influence to your buffing models to get the buffs going.
Then we have the concept of invalidating influence. Since influence is a limited resource each turn, if you can manage to get influence off the table somehow, you just reduced the amount of actions your opponent can do. Invalidating influence can be done by taking out a model with influence on, Disengaging through a counter-attack, or controlling a model in a way that it can’t reach you (through distance, conditions or plays like Goad from Marbles)
Momentum
Momentum is generated by using up your influence to make momentous attacks, passes or Take outs. Momentum is the second obvious resource and is very important. First of all, it determines initiative each turn. Having more momentum on your opponent often lets you go first in the following turn, depending a bit on the game plan cards(You can guarantee initiattive if the difference of momentum plus the initiative value of your card equals 8). That doesn’t mean you should just bunker every point of momentum you get.Healing your players is very important and sometimes you just need to get those conditions off. Dodging after passing can open up vectors and Defensive Stance/Counter Attacks can throw a wrench into your opponent’s plans.
Sometimes, Momentum can grant you “free” actions that you don’t have to pay influence for. Let’s look at the example of Counter-Attacks. Many people use counter-attacks just to disengage or threaten a disengage through dodges and pushes. While this certainly is a use, sometimes character plays triggered through the playbook have value, too. Mallet, for example, can trigger Singled out on the counter attack and then suddenly all the models have +2 TAC on your attacker, without mallet using any influence or needing to activate! I’m sure you’ll find other examples of counter-attacks that might not be good at disengaging, but certainly have other value.
The Ball
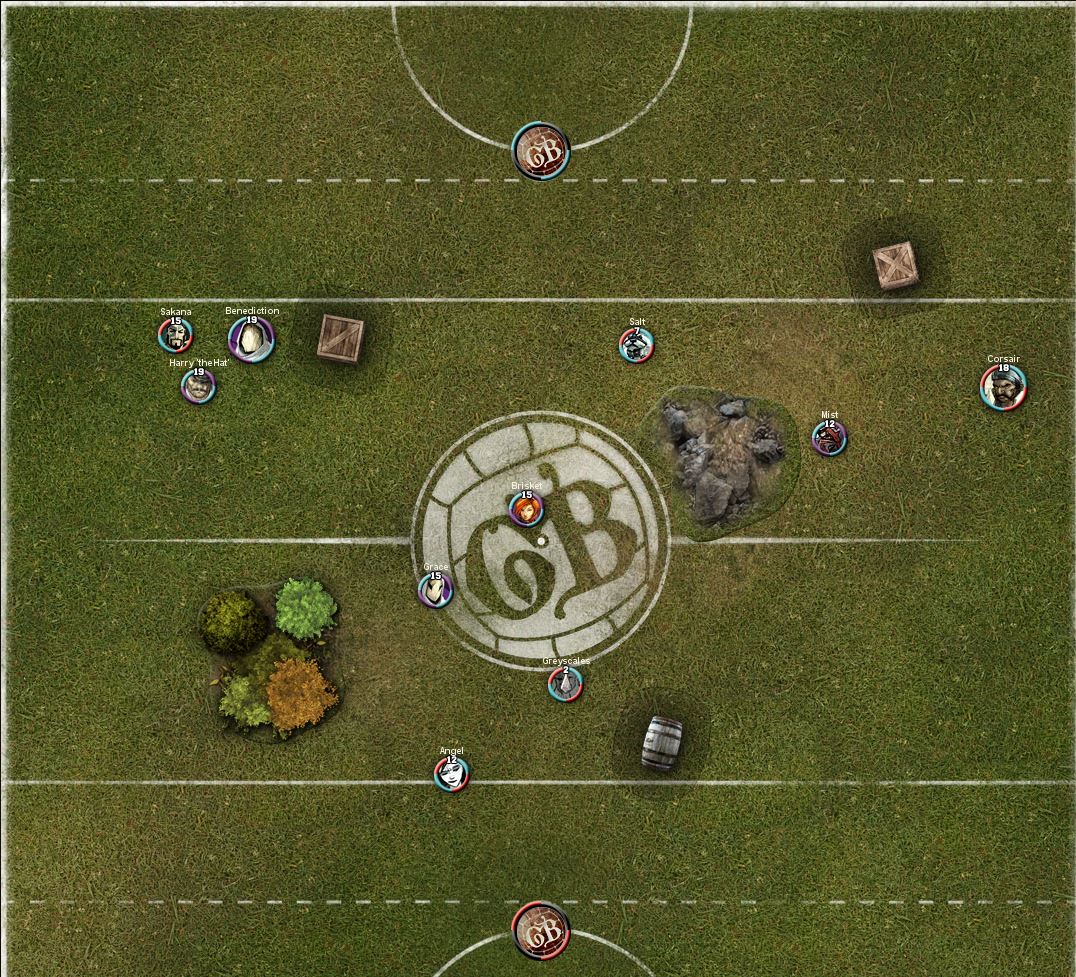
The Ball is a little special as a resource. Only one player can have it and controlling the Ball is a central part of the game. Having the Ball allows you to pass it for dodges, cash it in for 4 VP and a goal influence. A take-out focused team will often try to hold the ball away from you(killing the ball, not to be confused with the same named character play of Cinder) and use it to score the final 4 points.To see how massive of a difference the ball can make, I constructed a little example:
The Score is 8 – 6 in favour of the Fishermen. It’s the Order player’s turn
Case 1: Grace has the Ball
If Grace has the ball, she can get around the Unpredictable movement of Greyscales by passing the Ball to Brisket. If she then manages to deal 2 damage to him, the score will be 8 – 8 and Brisket is in a very good position to score and close out the game. I would argue that the game is very much in the Order’s favour here.Case 2: Greyscales has the Ball
If Greyscales has the Ball here, the Brisket player must somehow try to secure the ball. Mist or Brisket have to do it, but most likely will have to use Acrobatic on Mist or Route one on Brisket to get around the Umpredictable Movement and then the counter attack of Greyscales might even thwart that plan. While still winnable for the Order, the Fish are in a much stronger position than in case 1.Clock
While not a part of the core rules, Clock is an integral part of tournament games and if you want to go to tournaments (and you should at least try once, they are fun! ) you should learn that the clock is an asset and a weapon.Both you and your opponent get the same time (45 minutes + the 1 minute activations) to play your game. There is a simple goal here: Don’t clock yourself (first). If you clock yourself you get two disadvantages: You activations only last one minute (even bis ones) and every activation grants a VP to your opponent (even small ones). You can maybe get through 5 activations in 2 minutes, but your captain takes 1 minute and 15 seconds, that is fine as long as you are not clocked, but after clocking, this is bad.
If you have a clock advantage, it’s good to press it with fast activations. Take your time for the important ones, but if you have an empty mascot, don’t try to put it at the perfect spot. An activation that is “good enough” but doesn’t give your opponent time to think is better here.
Also, think while your opponent is doing things. It’s “free” thinking time for you.
Don’t be shy to take a longer activation if it’s important. Confirm everything with your opponent and do that activation as perfectly as possible.
And the last thing, even when you are down on clock, as long as you get your 12 points before (or as) the clock hits 0, it’s still good time management.
VP Conceded
So this one seems weird at first, but bear with me. If you played Magic, you know that Magic players use their healthpoints as a resource. It doesn’t matter if you win a Magic game with 20 or 1 HP left.Now, let’s flip our viewpoint of VP around. Let’s say you start with 12 Health, a Goal deals 4 Damage to you and a Takout 2. Sounds similar? Because it is.
The goal of Guild Ball is not to prevent your opponent from making VP, but to get to 12 VP faster than him. Trying to deny every single VP will result in you losing slower, but still losing. Of course, you don’t want to give out easy VP, but sometimes it’s better to let something happen.
Let’s have some examples:It’s 0 – 0, you have initiative and are facing a goalrun from Vitriol, but you could just let the goal happen and take out Smoke with 6 influence on her. Taking out Smoke let’s you invalidate influence, get activation advantage and 2 VP, for giving up 4 VP (if the Alchemist cashes in and also gives you control of the Ball). a pretty obvious example.
On the other hand, let’s say it’s 4 – 4 and you are now in the shoes of the Alchemist player and have initiative. Now you cunningly let Smoke have no Influence and take the goal, putting the score at 8 – 4. After Smoke gets taken out, it’s 8 – 6 and you just need one more goal to win. A worthwile trade in my opinion.
This is why being at 8 points is such a strong position in the game, because your opponent can’t afford to trade VP for board position anymore. Recognizing spots where you can give up some VP for a better position later will surely let you win more games.
No comments:
Post a Comment